
In the myth of the fictional Kamen Rider universe, belts and belt buckles have been an integral part of the character. Possibly because that area of the human body is believed to be the center of Chi energy. Chi is a concept held by many Asian cultures as a universal energy that people can channel for health and vitality.
For Kamen Rider V3, the belt called Double Typhoon, would use the twin turbines to draw in wind energy and allow him to change from his human form to superhero form.
The Double Typhoon design (see photo below) from the 70's TV show is a classic and is as iconic to fans as the helmet is. We wanted to keep the concept and feel of the original but make it more contemporary. Being a huge fan of the Kamen Rider V3 series, I wanted to pay homage to the original and was careful with what liberties we took with the design elements.

I worked with Calvin Lac, an Application Engineer here at RAPID Technology, on the design (see photo below). The drawing is also done by Calvin. We started the design process by looking at different versions of Kamen Rider V3 action figures and fan art. We tried as best as we could to come up with a unique version of the classic. From there, we examined the look and feel of the piece. We wanted the buckle to be aggressive and have some heft to it.

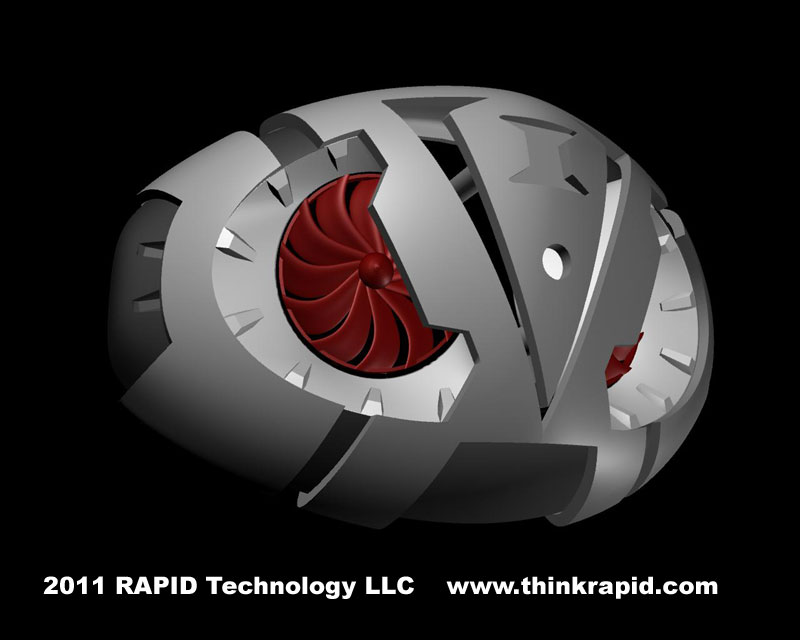
We developed the idea of setting the turbines back from the surface the way fighter jet engines are. This gave the buckle more depth and allowed us to be more creative with the shape of the openings for the turbines. The partially hidden turbines give the model visual interest and causes the viewer to move around the piece to take it all in.
Calvin did extensive research on fighter jet intake shapes and eventually settled on a configuration like the Harrier Jet. We spent a good deal of time balancing how visible the turbines should be. I wanted to keep the turbines a prominent part of the visual composition like the original, whereas Calvin took a practical approach to keeping the fans protected and hidden, like an actual fighter jet.
Once we had the main layout, we focused on the details. Since the intake wells were much more visible then that of a jet, they needed accents and Calvin actually drew inspiration for the buckle's intake "teeth" from a watch face he saw. He also suggested the idea of changing the number 3 to the Roman Numeral III. I thought it was a great interpretation and one that I had never seen before on any iteration of the character.
Calvin crammed all these ideas, brilliantly, into one drawing. Now it was my turn to transform a 2D sketch into a mythological personal power plant. This is the final design of the model I created in Maya.
From there, we began fine tuning the design. The model went through a couple of iterations.

Since the buckle wasn't curved enough to conform to the human body and the turbines did not stand out enough, we went back to the 3D model and made some adjustments. With their speed and low cost, the ZPrinters were the ideal tool for troubleshooting the design and within a few hours time we had the new version.
Here we have the raw prints.

This next image is a work in progress.

In this next image we see the buckle together again with the parts all painted just prior to assembly.

Next, we focused on the internal components.

In this picture, you can see the evolution of the turbine.

I had expected the turbines to undergo design iterations but the funny part is that I thought the fine tuning would be to the blades and their angles, not the cone. Turns out, we got the blades right the first time out. The "III" emblem was also created in the ZBuilder, again for the fine detail.
Here we have the final buckle assembled.

Just for effect, we took a shot of the buckle with the CRD helmet.

See more examples of how people are "Creating more" with 3D printing:
http://www.zcorp.com/en/Company/Customers/Case-Studies/spage.aspx
and
http://www.zcorp.com/en/forward/events.aspx?c=15
See the now famous viral 3D printing YouTube video


We get service NYC Printing
ReplyDeleteHi there. Can I use your design concepts for my Kamen Rider Cosplay project? I have always wanted to do KR V3 but I dont really like the Next (movie) version. And as much as I want to do the classic version, i wanna do a modern take on the character. Would like to use your design concepts.
ReplyDeleteDo contact me at ridhwan5@gmail.com
can u sell it to me? bogus_real@yahoo.com
ReplyDeleteThanks...
ReplyDelete3D Prototype Printing Services
Thanks...
ReplyDelete3d printed products