This week's guest post is by Jeff Cunningham, Senior Color Scientist at Z Corporation. In the past, Jeff has worked for the color management company Monaco Systems (now X-Rite) and the inkjet proofing company Iris Graphics (now Kodak), making Z Corporation’s full-color, 3D printing technology the perfect fit.
3D geometry can come from a variety of sources, from 3D scans of real objects to original digital works created on the computer. Wherever the source, the last rendering of the part we see before printing is on-screen, via ZPrint. Computer monitors and printers simply cannot create the same range of colors, whether the printer is 2D or 3D. For instance, printers can jet mixtures of yellow that you’ll never see on the computer screen, while monitors have a huge range of deep blues that won’t make it to paper or powder.
ZPrint does its best to compensate for this disparity of color performance between screen and print. Along the way it needs to make some assumptions, such as ‘what do the colors in this part look like on screen?’ ZPrint doesn’t know if you have an old, burnt-out CRT or cutting-edge RGB LED 10-bit LCD. Other applications ask themselves the same question when you’re looking at family photos or ordering clothes online. To address this problem, HP and Microsoft proposed a model based on “typical” monitor color performance – a standard assumption for applications, operating systems, and printer drivers to use. This model is called sRGB, and when in doubt, ZPrint is to assume that any color defined in a part should look as it does in the sRGB color space.
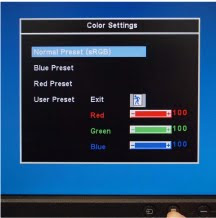
So then, how well does a given monitor match this theoretical sRGB space? It depends on the monitor, of course, but today’s mid-range and up displays can actually match it rather well. They may need to be told to do so though, and each monitor will have a different procedure for changing their color settings. On one random Dell monitor here at the office, it was quite easy. Through the on-screen menu, I only needed to select “Color Settings”, then found “Normal Preset (sRGB)” as the first and default option. You may need to refer to your display’s manual if you can’t find a sRGB option right away.
That’s the quick, easy, and free way to make sure your monitor is doing what ZPrint thinks it should be doing. Since ZPrint targets sRGB colors, this may also help with your screen-to-print color matching. There are more involved methods for calibrating monitors, but they generally require the purchase of special tools for measuring the actual color performance of your display. If color is critical to your application, and you don’t already have a colorimeter, try an Internet search for “monitor calibration”.
http://www.zcorp.com/
skip to main |
skip to sidebar

Subscribe to:
Post Comments (Atom)
Search This Blog
Scott Harmon

About Me
I am responsible for leading 3D Systems content creation and capture activities and, in partnership with business and functional leaders, developing new opportunities for the company. I have held a variety of leadership positions in marketing and business development and most recently ran a $150MM division of Church & Dwight, a leading consumer goods company. Prior to receiving my M.B.A from Harvard Business School, I was an Explosive Ordnance Disposal company commander for the U.S. Army. I graduated from the United States Military Academy at West Point with a B.S. in Electrical Engineering.


Great post Jeff. This info in combination with the ZP150 powder will provide us with the most accurate color matching to date.
ReplyDeleteThanks...
ReplyDelete3d printed products
Thanks......
ReplyDelete3d prototyping